4mm
4mm Vinyl Flooring
With its many advantages, 4mm vinyl flooring is a wise choice for anyone looking to enhance the beauty, functionality, and longevity of their space.
From its versatile design options and realistic appearance to its durability, easy maintenance, and waterproof properties, 4mm vinyl flooring proves to be a practical and aesthetically pleasing flooring solution.
Order your completely FREE, unlimited, no obligation LVT Flooring Samples today.
Our Top 10 Vinyl Floors
4mm Vinyl Flooring Samples
Find Your Perfect 4mm Vinyl Flooring With Our Free Samples
By offering free unlimited flooring samples, we enable you to envision the final appearance without any obligation to buy. After years in the flooring industry, we find this is the best way to find a floor that you will love more and more over the years. That’s why at Flooring365 you can order as many free samples as you’d like and have them delivered directly to your door, free of charge.
How To Order Your Free 4mm Vinyl Flooring Samples
To order your free vinyl flooring samples, click the ‘Order FREE Sample’ on the chosen product page. You can do this as many times as necessary before proceeding with your order, so we advise choosing a few styles. Once you have selected your favourites you can visit your cart to proceed with the order, completely free of charge. We even include free delivery, so there are no hidden surprises.
Quick & Easy Delivery
All of our samples are sent via royal mail, directly to your letterbox, so there’s no need to wait at home.
4mm Vinyl Flooring FAQ's
What Is 4mm Vinyl Flooring?
Vinyl flooring (also known as LVT or luxury vinyl tiles) is an innovative flooring solution that can mimic the appearance of wood or stone. Using advanced printing technology, vinyl flooring has mastered the art of this resemblance, with a textured surface and realistic shades.
Our 4mm vinyl flooring refers to a type of LVT flooring that is 4mm thick, offering a balance between durability and comfort underfoot. It is a popular choice due to its remarkable combination of aesthetics, practicality, and affordability. Its thickness contributes to a softer, more comfortable feel compared to harder surfaces, making it kind to feet in high-traffic areas. Additionally, 4mm vinyl flooring is waterproof, easy to clean, and resistant to stains and scratches, making it an ideal choice for households that are seeking a low maintenance yet stylish flooring solution. Not only that but its ease of installation using the Click Lok method allows for quick and cost-effective setups, solidifying its status as a practical and appealing flooring option.
Is 4mm Vinyl Flooring Good?
The short answer is yes. However, it’s important to look at your lifestyle and preferences to determine the best flooring solution for your home. These aspects, paired with the planned application will play a big role in choosing the right floor. For example, your hallway flooring will need to be hard-wearing and able to cope with high levels of traffic. Whereas your bathroom flooring will need to be waterproof. To help you determine if 4mm vinyl flooring is the right choice, why not take a look at some of its benefits below?
If you’re not sure what it is you’re looking for yet, get in touch with one of our experts.
4mm Vinyl Flooring Benefits:
Durable:
4mm vinyl flooring is known for its durability. The 4mm thickness provides a strong and stable surface that can withstand heavy foot traffic and daily wear and tear. It’s also resistant to scratches, stains, and dents, making it an ideal choice for high-traffic areas.
Waterproof:
Vinyl flooring is fully waterproof and therefore can handle spills and moisture without warping or damage. Due to this, it's one of the few floors that is suitable for areas prone to moisture, such as bathrooms, kitchens, and basements.
Cost-Effective:
Vinyl flooring is extremely cost-effective, especially when compared to natural materials like hardwood or stone. This makes it an attractive option for those looking for cost-effective yet stylish flooring solutions.
Versatile:
4mm vinyl flooring comes in a wide range of styles, colours, and patterns, including herringbone. You can find vinyl planks or tiles that mimic the look of hardwood, stone, tile, or various other materials, allowing you to achieve the aesthetic you desire.
Comfortable:
Vinyl flooring provides a comfortable underfoot feel that is soft to walk on and retains heat well. This makes it a suitable choice for rooms where you spend a lot of time standing or walking.
Quiet:
Due to its materials, vinyl flooring can help reduce noise transmission, which is often beneficial in multi-story homes or apartments. Our 4mm thick vinyl flooring has improved sound reduction by absorbing sound and providing a quieter environment.
Easy To Maintain:
4mm vinyl flooring is super easy to clean and maintain. Regular sweeping and occasional mopping with a mild detergent is all it requires to keep looking its best. Plus, it doesn't require special sealants or waxing like some other flooring materials.
Easy To Install:
4mm vinyl flooring is available in various installation methods, including bond down and Click Lok. This versatility makes it suitable for both DIY projects and professional installations.
Easy To Repair:
When repairing most floors, the flooring must be pulled up to be able to follow out repairs. With LVT flooring, the repairs can be followed out quickly and easily by replacing the individual tiles or planks.
How To Cut 4mm Vinyl Flooring
Cutting 4mm vinyl flooring can be done using a few different methods, depending on your tools and preferences.
1. Measure and Mark:
Measure the area where you need to cut the vinyl flooring and mark the measurement on the flooring itself using a pencil or chalk. Use a measuring tape or ruler to ensure accurate measurements.
2. Prepare Your Cutting Surface:
Place the vinyl flooring on a stable and flat cutting surface. You can use a piece of plywood or cutting mat to protect your flooring and provide a clean surface for cutting.
3. Straightedge:
Use a straightedge or T-square to create a straight cutting guide. Align the straightedge along the marked line on the vinyl flooring, ensuring it's positioned securely.
4. Apply Safety Gear:
Put on safety glasses to protect your eyes from any potential debris that may come from cutting the vinyl.
5. Make the Cut:
You can use either a utility knife or a vinyl flooring cutter for this task.
If you're using a utility knife, make sure the blade is sharp. Score the vinyl flooring along the marked line using the utility knife. Apply firm and consistent pressure but avoid cutting too deeply into the underlying surface. You may need to make multiple passes until the vinyl is cut through.
If you have a vinyl flooring cutter, that’s even better. Place the cutter's blade on the marked line and press down while using the cutter to roll along the line. This tool is generally easier to use and produces cleaner cuts.
6. Finish the Cut:
Once you've made the initial cut, gently bend the vinyl flooring along the cut line to create a separation. If you've used a utility knife, you can cut through any remaining uncut areas using the same technique. For a vinyl flooring cutter, it may cut through completely in one pass.
7. Trim Any Edges:
If there are any rough or uneven edges, you can use a utility knife to trim them carefully. Be cautious not to damage the rest of the flooring.
8. Clean Up:
Remove any debris and dust from the cut area and your cutting surface.
Remember to take your time and work carefully to ensure a clean and precise cut. Always follow safety precautions, especially when using sharp tools, and contact a professional to complete the work if you don’t feel comfortable. If your vinyl flooring has a pattern or design, make sure to align the pattern correctly before making your cuts to maintain a cohesive look in your installation.
How To Lay 4mm Vinyl Flooring
The way that you lay your vinyl flooring will depend on the chosen installation method. With LVT flooring, your installation choices are bond down or Click Lok. Both of these installation methods are relatively easy, especially when using vinyl flooring. However, if you have no previous experience of laying floors and plan on a DIY installation, we highly recommend choosing Click Lok. This method is often referred to as "floating" because the flooring is not glued or nailed down to the subfloor; instead, the individual planks or tiles lock together to form a stable and secure surface.
1. Prepare the Subfloor:
Ensure that your subfloor is clean, dry, level, and free of any debris or protruding objects. If necessary, use a self-levelling compound to correct any uneven areas.
2. Acclimate the Flooring:
Allow the 4mm vinyl flooring planks to acclimate to the room's temperature and humidity for at least 48 hours before installation.
3. Install Underlayment (if required):
If you have bought your 4mm vinyl flooring from us, you can skip this step since we already include built-in underlay within the boards for added insulation, soundproofing, and moisture protection.
4. Plan the Layout:
Determine your starting point and the direction in which you want the planks to run. Typically, you'll start in a corner of the room and work your way towards the exit. Leave a 1/4-inch expansion gap around the perimeter of the room for expansion and contraction.
5. Install the First Row:
Place spacers against the wall to create the expansion gap. Then lay the first plank in the corner with the groove facing the wall. Then insert the protruding edge of the plank into the groove of the first at a slight angle before pressing it firmly into place.
6. Secure the boards:
Lay subsequent rows by clicking and locking the boards into place, ensuring that the protruding edges are slid into the groove of the last board. Once you hear a ‘click’ sound, you’ll know they are locked securely into place.
7. Continue layout:
Stagger the seams between planks, ensuring that the joints are at least 6 inches apart from row to row. Then continue installing planks row by row until you reach the final row.
8. Measure & cut:
Measure and mark any planks that need to be cut to fit around obstacles or along the edges of the room. Then use a crosscut or mitre saw to make precise cuts as and when required.
9. Install final boards:
Measure and cut the last row of planks to fit, allowing for the expansion gap. Then inspect the entire installation for any visible gaps or issues, making any necessary adjustments or corrections before proceeding.
10. Remove Spacers:
Once the flooring is in place and secure, remove the spacers from the perimeter of the room.
11. Install Transitions (if needed):
Install any beading, skirting, or transitions that you require around the room and doorways. This will provide a finished look and allow for expansion and contraction.
These instructions should be used as rough guidance only and we would never advise taking on a task that you don’t feel comfortable with. If this project sounds too involved for you, why not take a look at getting a quote from a professional installer?
Vinyl Flooring Finishes & Treatments
Embossed
Our embossed luxury vinyl tiles are the closest replica you can get to a wood or stone floor, without the cost. The texture produced during the embossing process will follow the pattern in the design image. This makes it incredibly difficult to tell that it has been purposely produced that way.
Textured
Our entire luxury vinyl flooring range is textured to some degree to make it feel and look authentic. Whilst not as apparent as our embossed floors, you’ll find that our textured products are extremely competitive in pricing. In terms of budget-friendly flooring, you really can’t beat our textured luxury vinyl tiles.
Stone Embossed
The beauty of luxury vinyl wood flooring is that it is not limited in terms of appearance. Thanks to the way in which our luxury vinyl flooring is produced, you can now have a stone floor without the cost. So, instead of having cold feet about whether or not to opt for stone, why not consider our cost-effective alternative?
Wood Effect
Wood effect floors are still the most popular type of luxury vinyl wood flooring that we sell, with more people opting for a budget-friendly option to solid wood flooring each day. Whether textured or embossed, our luxury vinyl wood flooring looks particularly impressive, mimicking solid wood very closely.
Vinyl Flooring Thickness
Board Thickness
Generally speaking, board thickness is a case of personal preference, however, thicker boards, whilst usually more expensive do tend to be more hard wearing and provide a slightly improved sound reduction performance, which should be considered in upstairs apartments or bedrooms, for example. As well as this, thicker boards are usually more suited to higher traffic areas, where they can withstand greater use.
Vinyl Flooring Installation Methods
Click Lok System
Most of our luxury vinyl wood flooring range features a Click Lok system for quick and easy installation. This is a glue-free, interlocking fitting system, which can be laid relatively easily on top of a floating floor. The simple installation method makes luxury vinyl wood flooring ideal for people who are looking to install their flooring themselves. However, it’s important to think about the underlying surface on which your new LVT flooring will be laid. Uneven surfaces make Click Lok much more difficult to install so it's crucial that you prepare the subfloor before fitting. A level subfloor will provide a high-quality finish for your LVT flooring.
Bond Down Installation
Some of our vinyl floors still use the bond down installation method since they are too thin to include a Click Lok system. The bond down installation method allows you to glue your luxury vinyl tiles directly to the subfloor. Using a strong adhesive, it creates a sturdy finish that won’t buckle under the pressures of daily life. However, you should ensure the subfloor is suitable before considering bond down luxury vinyl tiles. For a successful bond down installation, it is crucial to have a smooth and level subfloor, ensuring firm adhesion of the glue. Once installed correctly, the bond-down method provides exceptional durability and a long-lasting lifespan.
-

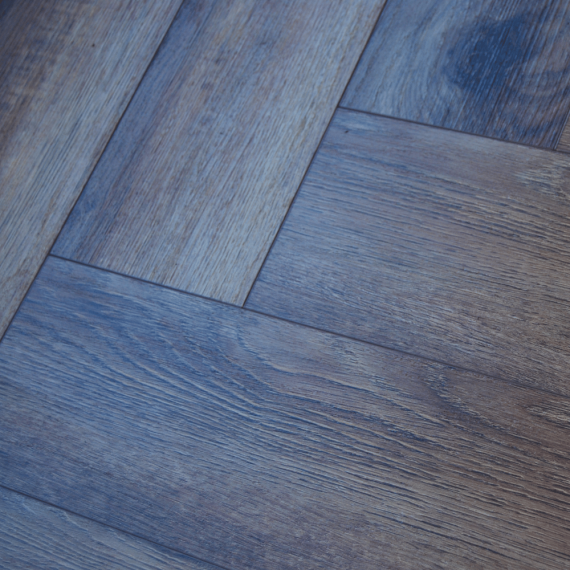 Valore Luxury Vinyl Smoked Oak 123mm x 4/0.5mm Herringbone LVT FlooringRating:100%
£ 49.49 m² inc. VAT
47.65X As low as 45.38£20.99㎡
inc. VAT£20.99㎡
inc. VATProduct Code: V125SMOK1
-
Species
-
TexturedFinish
-
123mm X 4mmWidth/Depth
-
Click Lok SystemInstall
-
615mmLength
-
-
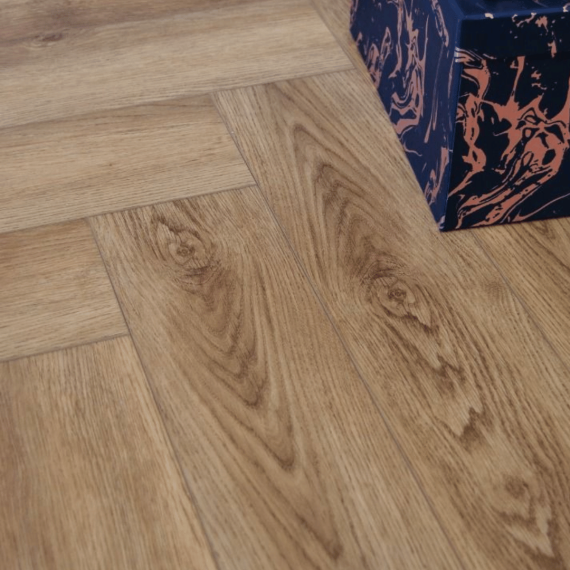 Valore Luxury Vinyl Golden Oak 123mm x 4/0.5mm Herringbone LVT FlooringRating:100%
£ 44.49 m² inc. VAT
47.65X As low as 45.38£20.99㎡
inc. VAT£20.99㎡
inc. VATProduct Code: V125GOL1
-
Species
-
TexturedFinish
-
123mm X 4mmWidth/Depth
-
Click Lok SystemInstall
-
615mmLength
-
-
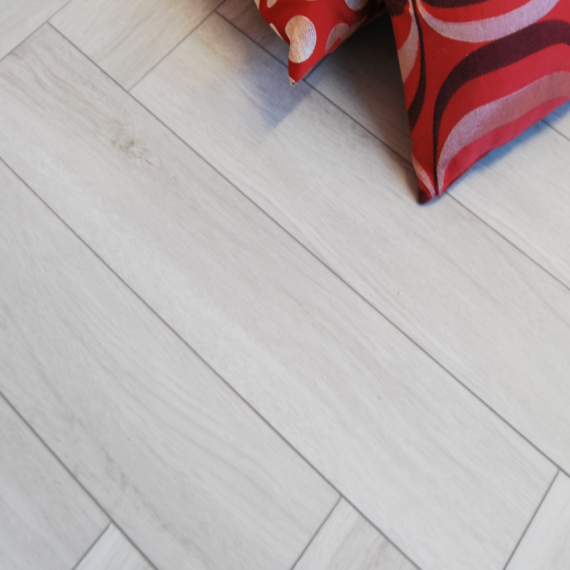 Valore Luxury Vinyl Light Grey Oak 123mm x 4/0.5mm Herringbone LVT FlooringRating:100%
£ 44.49 m² inc. VAT
47.65X As low as 45.38£20.99㎡
inc. VAT£20.99㎡
inc. VATProduct Code: V125LIGHTG1
-
Species
-
TexturedFinish
-
123mm X 4mmWidth/Depth
-
Click Lok SystemInstall
-
615mmLength
-


-
 Valore Luxury Vinyl Smoked Oak 123mm x 4/0.5mm Herringbone LVT FlooringRating:100%47.65
£20.99㎡
inc. VAT -
 Valore Luxury Vinyl Golden Oak 123mm x 4/0.5mm Herringbone LVT FlooringRating:100%47.65
£20.99㎡
inc. VAT -
 Valore Luxury Vinyl Light Grey Oak 123mm x 4/0.5mm Herringbone LVT FlooringRating:100%47.65
£20.99㎡
inc. VAT


