


Introduction
Proper installation is the key to a beautiful, long-lasting engineered wood floor. While 18mm engineered wood is versatile and forgiving, getting the fundamentals right makes all the difference. This comprehensive guide covers everything you need to know, from bringing the boards into your home to that satisfying final click.
Before You Begin: Acclimatisation
All wood flooring must be acclimatised before fitting for a smooth and successful installation. For the best results, engineered wood flooring should be acclimatised for a minimum of 48 to 72 hours.
Acclimatisation Requirements
|
Factor |
Specification |
|
Duration |
48–72 hours minimum, longer in winter months |
|
Temperature |
18–22°C (60–80°F) |
|
Humidity |
40–60% relative humidity |
|
Placement |
Keep in original packaging, stack loosely, and store flat |
Leave your flooring flat in the room where you plan to install it, with air circulation around all sides. This helps prevent warping as it adjusts to the temperature and humidity conditions of your home.
For at least several days before installation, the room should have stable conditions with permanent HVAC operating. The goal is to reach equilibrium moisture content, where boards are neither gaining nor losing moisture. In new builds, wood flooring should be one of the last items installed, after all wet works such as plastering and painting are completed and fully dry.

Subfloor Preparation
A perfect installation starts with a perfect subfloor. Here are the most important requirements.
Flatness
The subfloor must be flat. The maximum allowable deviation is 3mm over a 3-metre length, or 2mm over 2 metres. Any high spots should be sanded down, and low spots should be filled with a suitable levelling compound.
Moisture
Moisture is the enemy of wood flooring. For concrete subfloors, use the following guide:
|
Test Method |
Acceptable Reading |
|
Relative Humidity (RH) test |
Below 75% for floating installations |
|
Calcium Carbide (CM) method |
Below 2% |
For wooden subfloors, moisture content should not exceed 12%, and there should be no more than a 4% difference in moisture content between the flooring and the subfloor.
Concrete substrates should be cured for at least 60 days before installation.
Cleanliness
The subfloor must be clean, dry, structurally sound, and free from dirt, debris, protruding fasteners, or any other residue that could affect the installation.
Underlay Selection
|
Installation Type |
Underlay Requirement |
|
Floating |
3mm underlay with integrated vapour barrier |
|
Glue-down |
No underlay required |
|
Over joists |
No underlay, insulation between joists optional |
For apartments or multi-family dwellings, a 5mm acoustic underlay can help reduce noise transmission to neighbours.
Installation Methods for 18mm Engineered Wood
Method 1: Floating Installation
Floating is the most common DIY-friendly method. Boards are clicked together and float over the underlay rather than being attached to the subfloor.
Best for: Concrete subfloors, DIY installers, and rooms where you may want to change the floor in the future.
Most modern click systems are designed to be used without glue. However, some thicker 20mm engineered wood products with traditional tongue-and-groove joints may require gluing.
Method 2: Glue-Down Installation
Boards are fully adhered to the subfloor using flexible flooring adhesive.
Best for: Concrete subfloors, rooms with underfloor heating, and areas where maximum stability is required.
Method 3: Secret-Nailing
Boards are nailed through the tongue at an angle, which hides the fixings.
Best for: Plywood subfloors, timber bases, and achieving the most solid feel.
Method 4: Direct Over Joists
You can lay engineered wood directly on floor joists, but only if the flooring is at least 18mm thick.
Requirements:
-
Minimum 18mm thickness
-
Fixed-length boards for proper support
-
Joist spacing no more than 400mm
-
Boards nailed or screwed directly to joists
-
Adequate ventilation below to prevent moisture build-up
Critical Installation Details
Expansion Gaps
Always leave an expansion gap around walls and fixed objects. For engineered hardwood, 12mm is recommended as the standard gap.
|
Location |
Gap Required |
|
Walls |
10–15mm |
|
Door frames |
10–15mm |
|
Pipes |
10–15mm around pipe |
|
Fixed objects such as columns or islands |
10–15mm |
For rooms exceeding 12 metres in length or 8 metres in width, additional expansion breaks with T-mouldings are required.
Door Frames
Always undercut door jambs so the flooring slides underneath for a clean, professional finish. This prevents unsightly gaps and allows for proper expansion.
Radiator Pipes
Finish around pipes with pre-finished hardwood dowelled ferrules, or cut a neat hole with enough room for expansion using a hole saw.
Final Steps
After installation:
-
Remove all expansion spacers
-
Install skirting boards or scotia or quarter round
-
Fix skirting to the walls, not the floor, so the floor can still move freely
If possible, the installation will look better if the skirtings are removed and replaced on top of the new wooden floor, allowing for the manufacturer’s specified expansion gap. Where this is not possible, a scotia moulding in white or matching hardwood can be used.
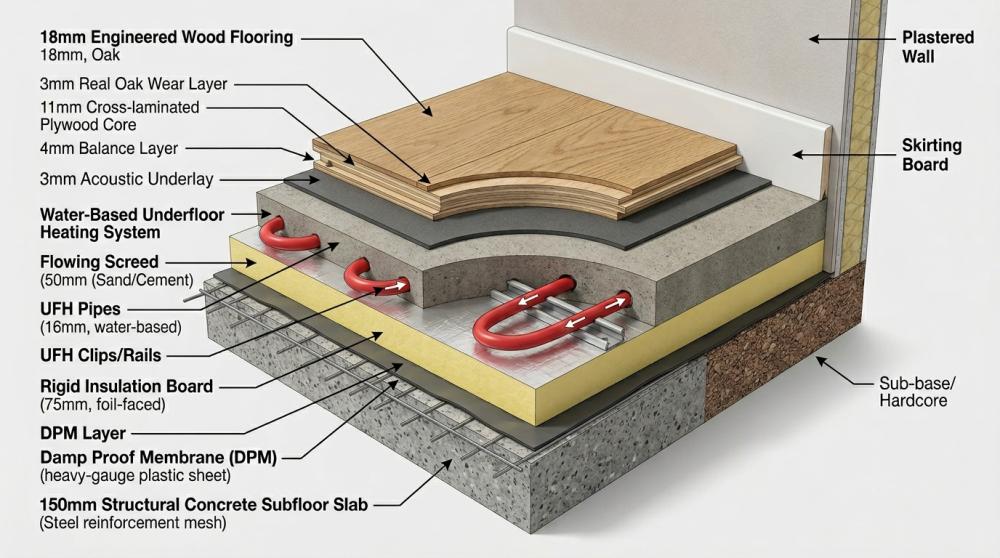
Underfloor Heating: Special Considerations
18mm engineered wood is compatible with underfloor heating, but only with water-based systems. Electric underfloor heating can overheat and damage the boards.
Best Practices for Underfloor Heating
-
Choose boards with a wear layer of 5mm or less for the best heat transfer
-
Gradually increase temperature over 5 to 7 days after installation
-
Never exceed 27°C surface temperature
-
Maintain consistent humidity between 40% and 60% all year round
-
Always check specific product guidelines before installation
Common Mistakes to Avoid
|
Mistake |
Consequence |
|
Skipping acclimatisation |
Gaps, warping, cupping |
|
Insufficient expansion gaps |
Buckling, lifted boards |
|
Ignoring subfloor moisture |
Mould, rot, adhesive failure |
|
Wrong underlay choice |
Noise, instability |
|
Pinning floor under kitchen islands |
No room for movement, buckling |
Conclusion
Installing 18mm engineered wood flooring is a rewarding project that can transform your home. By following these guidelines, including proper acclimatisation, careful subfloor preparation, correct expansion gaps, and the right installation method, you can help ensure decades of beauty and performance from your new floor.
Need more advice? Contact our expert team or visit our installation guides section for product-specific instructions.


